Introduction
The Xbox One controller is one of the most popular gaming devices available in the market. Sadly, it’s not uncommon for the controller to develop faults. Common issues like broken buttons, unplanned disconnections, or dirty filters may warrant taking the controller apart. This article aims to provide a comprehensive guide to help gamers take apart their Xbox One controller. We will explore the step-by-step process, video tutorial, infographic, common issues, tools required, safety precautions, and tips and tricks.
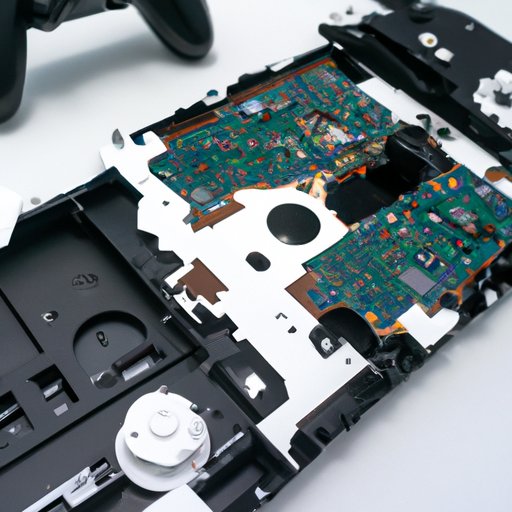
Step-by-Step Guide
Taking apart an Xbox One controller requires handy tools and a step-by-step approach that guarantees all functional components are removed intact. Here is a detailed guide on each step:
Tools Required
- T6 screwdriver
- Small Phillips head screwdriver
- Small flat head screwdriver
- Plastic pry tool
Removing the Battery Cover and Battery
- Turn the Xbox One controller over so that you can see the back.
- Remove the batteries by pushing the sliding tab to the side and lifting the batteries out of place.
- Once you’ve removed the batteries, remove the bottom cover by unscrewing all of the six screws. Use the Phillips head screwdriver for this.
Removing the Front and Back Panels, Triggers, and Bumpers
- With the controller’s face down, begin by unscrewing the four screws that hold the bottom and top covers together. Use the T6 screwdriver for this.
- Use the plastic pry tool to gently pry open and remove the top panel by sliding it upward. Put the panel aside but do not forget the buttons or the vibration motors attached to it.
- Remove the two small screws securing the vibration motors and set them aside. Unscrew two more screws on either side of the batteries to detach the front portion of the controller.
- To detach the back, remove the screws holding the back handle in place. You should now have access to the two bumpers, the one trigger, and the motherboard.
Removing the Thumbsticks and D-pad
- Remove the plastic cover that sits between the D-pad and joystick and set it aside.
- Using a small flat head screwdriver, remove the clip holding the joystick in place and gently remove the joystick. Do the same for the second joystick.
- Using the Phillips head screwdriver, remove the four screws that hold the D-pad in place and remove the D-pad from the controller.
Reassembling the Controller
- Start by reconnecting the D-pad to the small motherboard.
- Next, reinsert the two thumbsticks and attach the cover between the D-pad and joystick.
- Reattach the motherboard to the trigger, bumper, and battery components, making sure that all screws are tight.
- Once you have ensured that all the screws holding the front and back panels, triggers, and bumpers are tight, fit the top panel back into place.
- Reinsert the vibration motors and fit the bottom cover over the motherboard.
- Finally, reinsert the batteries by snapping them back in place.
Video Tutorial
For better clarity, we have included a video tutorial on how to take apart an Xbox One controller. This tutorial will offer additional aid to the written guide.
The process of taking an Xbox One controller apart was recorded to make the video tutorial. The close-up of the controller components and expert narration provide detailed instructions that complement the written guide.
Infographic
Let’s break down the process of taking an Xbox One controller apart into a clear, visual format. Our accompanying infographic below displays all of the critical steps, with diagrams and outlines for clarity.

Common Issues
Some common problems with Xbox One controllers are broken buttons, connectivity issues, and dirty filters. Often, these problems can require taking the controller apart for a fix.
For broken buttons or connectivity issues, make sure to reconnect any loose connections and replace worn-out components. Dust or dirt accumulation in the filters or motors can also affect the controller’s functionality. Cleaning the controller is the recommended solution for such an issue.
Tools Needed
To take apart an Xbox One controller, you will require a few basic tools. You will need a T6 screwdriver, a small Phillips head screwdriver, a small flat head screwdriver, and a plastic pry tool.
If you don’t have these tools handy, consider purchasing an Xbox One Controller Repair Kit. Besides the necessary tools, these kits also come with additional components like batteries, screws, and conductive rubber pads.
Safety Precautions
Before getting started with disassembling the controller, you must take certain safety precautions. Here are a few things to keep in mind:
- Turn off your Xbox One console and unplug the controller from the console before beginning any work on it.
- Wear an anti-static wristband, so you don’t accidentally damage any of the internal components.
- Work on a clean, dry, and static-free surface.
- Be gentle when prying open the controller, to avoid cracking any of the plastic components.
- If you encounter any broken parts, replace them or the entire controller if necessary.
Tips and Tricks
Here are a few tips that could make the process of taking an Xbox One controller apart more manageable:
- Take your time to read and follow the instructions in the step-by-step guide and watch the video tutorial before proceeding.
- When prying open the controller, start at the bottom and work your way upward, so the clips release naturally.
- When removing the motherboard, be sure to disconnect any wires or plugs carefully, so you don’t damage the connectors or rip the wires.
- Before reassembling the controller, test each component to ensure its functionality.
- Label your screws and their corresponding holes to reassemble the controller quickly.
Conclusion
In conclusion, taking apart Xbox One controllers may seem daunting, but it is not impossible. With the right tools, safety precautions, and guidance, anyone can successfully disassemble their controller for repair or maintenance. Our step-by-step guide, video tutorial, infographic, common issues, tools required, safety precautions, and tips and tricks will provide assistance, ensuring the process is seamless. So, go ahead and give it a try.


