I. Introduction
Hydrangeas are among the most popular and beautiful flowering shrubs in the world. Known for their large, colorful blooms that range from white to pink to blue, hydrangeas are a garden favorite for their stunning aesthetics and versatility. One of the best things about hydrangeas is that they are easy to propagate, making it simple to reproduce your favorite varieties and create stunning new plantings.
The purpose of this article is to provide a step-by-step guide on how to propagate hydrangeas, covering everything from cuttings to hydroponics to seed propagation. No matter whether you are a seasoned gardener or a beginner, this guide will help you discover the joys of propagating hydrangeas and create beautiful, thriving gardens that will amaze your visitors and delight your senses.
II. Step-by-Step Guide to Propagating Hydrangeas: From Cuttings to Rooting Hormones
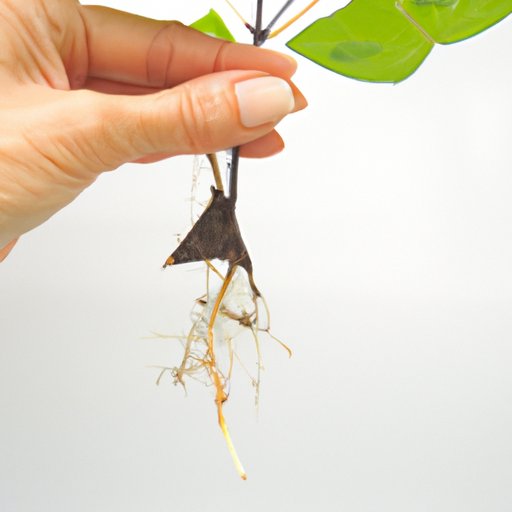
Propagating hydrangeas from cuttings is one of the easiest and most popular methods. To start, take a cutting from a healthy, established hydrangea in late spring or early summer – choose a branch with several sets of leaves and remove the leaves from the bottom set
Next, prepare the cutting by snipping off any flowers or buds, leaving two to three sets of leaves at the top, and cutting the stem at a 45-degree angle. Dip the bottom edge of the cutting into rooting hormone, tap off any excess, and poke a hole in your growing medium.
Insert the cutting into the hole, gently but firmly pressing the soil around it, water it in and then cover it with a plastic bag to create a mini greenhouse. Place it in indirect sunlight, water regularly, and wait for the roots to form at the base of the cutting. Once roots have developed, you can transfer it to a larger pot or into the garden.
Rooting hormone can significantly increase your chances of success when propagating hydrangeas. It contains an essential plant hormone called indolebutyric acid (IBA), which stimulates root growth in plant cuttings, improves growth rate, and increases your overall success rates.
III. 10 Expert Tips on Successfully Propagating Your Own Hydrangeas
Timing is critical when it comes to propagating hydrangeas. You should aim to take cuttings in early to mid-summer when the stems have just begun to harden, and there are no buds or flowers on them. This ensures that the plant is not in active growth mode, making it easier to take cuttings and ensuring an excellent success rate.
It’s important to choose healthy, mature plants to take cuttings from, as they are likely to have more resources to create new growth.
When propagating hydrangeas, you need to make sure that they are in an environment that is conducive to growth. Keep the soil moist but not soggy, provide bright indirect light, and keep the cuttings out of direct sunlight and wind.
Hydrangeas can be propagated in several ways, including cuttings, hydroponics, division, and seed propagation. Experiment with different methods and see which one works best for you.
IV. The Beginner’s Handbook to Hydroponic Hydrangea Propagation
Hydroponic propagation involves growing plants in nutrient-rich water, removing the need for soil. It involves placing your cutting into a hydroponic plant medium such as rockwool, peat moss, or clay granules, and then placing them in a hydroponic unit or a DIY setup made from a plastic container and UV light.
Hydroponic propagation is an excellent option because it reduces the risk of disease and gives you more control over the plant’s growth environment. It is also an excellent way to propagate a large number of plants in a small space, making it perfect for those with limited garden space.
V. DIY Guide: How to Propagate Hydrangeas from Division
Division propagation is when you divide a mature hydrangea plant into smaller pieces, each with an equal amount of roots, shoots, and stems.
The best time to divide hydrangeas is in late summer or early fall after they have finished blooming for the season. Dig up the root ball, shake it off, and gently separate it into smaller pieces with a sharp knife or garden fork. Replant each piece in a new location or container.
VI. A Comprehensive Guide to Germinating and Propagating Hydrangea Seeds
While propagating hydrangeas from seed can be a little more involved, it can be a great way to create new and unique plant varieties. You will need to plan well ahead, collecting your seeds from dried flower heads and then storing them in a cool, dry place until spring.
To germinate your seeds, fill a seed tray with compost, sprinkle the seeds on the top, and then cover them with a thin layer of vermiculite. Water the tray gently until the soil is moist, and then place them in a warm location with plenty of light. Keep them moist and wait for them to sprout, before planting them into a pot or into your garden.
VII. Conclusion
Propagating hydrangeas is an enjoyable and rewarding experience, whether you are a seasoned gardener or a beginner. From cuttings to hydroponics to division to seed propagation, there are numerous methods you can use to create an endless supply of gorgeous hydrangeas that will beautify your outdoor and indoor spaces.
With our expert tips and detailed instructions, we hope that we have helped you understand how to propagate hydrangeas with ease and confidence. So go ahead and start experimenting with the different methods today.


