Introduction
Screen protectors are an essential accessory for anyone who wants to keep their device in pristine condition. Not only do they safeguard your phone or tablet from scratches and cracks, but they also add another layer of protection against dirt, dust, and other debris.
However, screen protectors are not foolproof, and one of the most common issues is bubbles forming underneath the protector. In this article, we’ll explore the different types of screen protectors, what causes bubbles to form, and most importantly, how to remove bubbles from your screen protector once and for all.
The Ultimate Guide to Removing Bubbles from Your Screen Protector
Different types of screen protectors
There are typically two types of screen protectors: plastic and tempered glass. Plastic protectors are more affordable but tend to scratch more easily. Tempered glass protectors are more expensive but offer superior protection and are more durable.
Causes of bubbles in screen protectors
Bubbles can often appear when the screen protector is not installed correctly. Dust, debris, and fingerprints can create air pockets when the protector is applied, which can eventually turn into bubbles. Exposure to moisture or high humidity can also cause bubbles to form.
Importance of removing bubbles
While bubbles may seem like a minor inconvenience, they can actually reduce the effectiveness of your screen protector. When the protector doesn’t adhere properly to your device, it leaves your device’s screen exposed and vulnerable to scratches, cracks, and other damage.
Tools needed to remove bubbles
You don’t need any specialized tools to remove bubbles from your screen protector. All you need is a microfiber cloth, a credit card or plastic scraper, and a little bit of patience and care.
Step-by-step guide to remove bubbles
Follow the steps below to easily remove bubbles from your screen protector:
5 easy steps to remove bubbles from your screen protector
Step 1: Prepare the surface
Take some time to prepare your device before you start removing bubbles. Make sure the surface is clean and free of dust, debris, and fingerprints. Use a microfiber cloth to gently wipe down the screen.
Step 2: Apply the screen protector
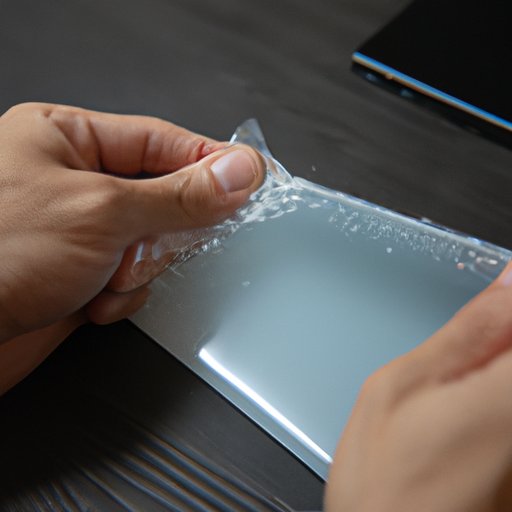
If you haven’t already applied the screen protector, now is the time to do so. Follow the manufacturer’s instructions carefully, making sure to align the protector correctly and apply it smoothly and evenly.
Step 3: Press out bubbles
Take your time and gently press out any bubbles that appear using your fingers. Start at the center of the screen and work your way outward to the edges.
Step 4: Use a credit card
Using a credit card or plastic scraper, gently push any remaining bubbles out towards the edge of the screen protector. Be careful not to push too hard, as this can cause damage to your device or the protector.
Step 5: Wait and enjoy
It may take a few hours for any remaining bubbles to disappear completely. Simply wait and let the protector adhere to your device before using it as normal.
Say goodbye to bubbles: Tips for getting rid of screen protector bubbles
Avoiding dust and debris
The best way to avoid bubbles in the first place is to work in a clean, dust-free environment when applying your screen protector. Make sure to wipe down your device and any tools you may use before starting, and avoid working near windows or in particularly dusty areas.
Avoiding fingerprints and other oils
Fingerprints and other oils can also cause bubbles to form when applying your protector. Make sure your hands are clean and free of any oils or lotions. Try to avoid touching the screen protector once you’ve applied it.
Cleaning the screen protector
Regularly cleaning your device and screen protector can help prevent bubbles from forming. Use a microfiber cloth to gently wipe down the screen protector and your device screen, being careful not to apply too much pressure or use any abrasive materials.
Using a hairdryer or heat gun
If you’re still having trouble removing bubbles, try using a hairdryer or heat gun to gently warm up the protector. This can help the protector adhere to your device more evenly and reduce the appearance of bubbles.
Adjusting your technique
If all else fails, try adjusting your technique when applying your screen protector. Apply the protector slowly and carefully, making sure to smooth out any bubbles as you go. Work methodically from the center outwards and avoid pressing too hard or using any sharp tools.
How to properly install a screen protector and get rid of bubbles
Preparing your working area
Before you start, make sure your work area is clean and free of any dust or debris. Use a microfiber cloth to wipe down your device and any tools you may be using.
Cleaning your device
Make sure your device is clean and free of fingerprints and oils. Use a microfiber cloth or cleaning solution to gently wipe down the screen and surrounding areas.
Aligning the screen protector
Take your time and make sure the screen protector is aligned correctly before applying it. Use the manufacturer’s instructions as a guide and work slowly and carefully.
Tips for installation
Use a credit card or similar tool to smooth out any bubbles as you apply your screen protector. Work methodically from the center outwards and avoid pressing too hard or using any sharp tools.
Confirming a bubble-free installation
Once you’ve installed your screen protector, take some time to check for any bubbles or imperfections. Use a microfiber cloth to gently press out any bubbles that may appear, being careful not to apply too much pressure.
DIY solutions for removing bubbles from your screen protector
Using tape
You can use a piece of tape to remove bubbles from your screen protector. Simply stick the tape onto the bubble and gently lift it up to remove the air pocket.
Using toothbrush or Q-tip
A toothbrush or Q-tip dipped in rubbing alcohol can help remove stubborn bubbles from your screen protector. Simply dab the solution onto the bubble and gently press it out towards the edge of the screen protector.
Using rubbing alcohol or a cleaning agent
Rubbing alcohol or a cleaning agent can also help remove bubbles. Apply a small amount to the bubble and use a microfiber cloth or similar tool to gently press it out.
Other DIY solutions
Other DIY solutions include using a plastic bag, warm water, or even a suction cup to remove bubbles from your screen protector. However, be careful when using these methods as they can sometimes cause more harm than good.
Common mistakes to avoid when using DIY solutions
When using DIY solutions, it’s important to avoid using any tools or materials that may scratch or damage your device or the screen protector. Only use gentle, non-abrasive materials and work slowly and carefully.
Conclusion
Recap of main points
Screen protectors are an essential accessory for anyone who wants to keep their device in optimal condition. Bubbles can be a frustrating problem, but they are easily remedied with a few simple tools and techniques. Remember to work in a clean, dust-free environment and take your time when applying your screen protector.
Importance of regularly checking for bubbles
It’s important to regularly check for bubbles and imperfections in your screen protector to ensure optimal protection for your device. Take some time every week or so to inspect your protector and remove any bubbles or debris that may have accumulated.
Final thoughts on protecting your device
Screen protectors are just one aspect of device protection, but they are an important one. By following the tips and techniques outlined in this article, you can keep your device looking and functioning like new for years to come.


