I. Introduction
The human ear is a small but intricate part of the body that can be quite challenging to draw. If you’re a beginner artist, learning how to draw an ear can seem like a daunting task. However, by following some basic steps, you can master the art of drawing an ear in no time. This article will offer a step-by-step tutorial on how to draw an ear, as well as tips and tricks to help you get the proportions and shapes right.
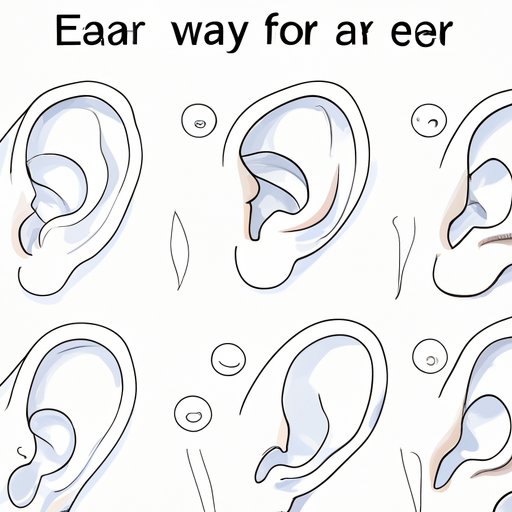
II. Step-by-Step Tutorial
The first step in drawing an ear is to sketch the general shape of the ear. Draw a light circle where you want the ear to be, and then draw a more defined outline around the circle. Next, add the details of the ear, including the helix, antihelix, tragus, and lobule. Use a reference image or an actual ear as a guide to get the details right. Once you have the details sketched out, you can start shading the ear to add depth and dimension.
III. Anatomy and Proportions
To draw an ear accurately, you need to understand its anatomy and proportions. The ear is made up of the helix (the outer rim), the antihelix (inner part of the ear), the tragus (small flap of cartilage in front of the ear canal), and the lobule (fleshy lower part of the ear). The ear should be roughly the same length as the nose and extend from the eyebrow to the bottom of the nose. The height of the ear should be about two-thirds the length of the face.
IV. Reference and Observation Techniques
When drawing an ear, it’s important to study reference images or real-life ears to capture the details accurately. You can use photographs, still life setups, or real-life models as your references. Another helpful technique is to observe the ear from different angles to capture its unique shape and contours. You can also practice drawing different ear types, such as elf ears or animal ears, to develop your observation skills.
V. Common Mistakes to Avoid
One of the most common mistakes beginners make when drawing an ear is getting the shape and perspective wrong. To avoid this mistake, use reference images or models to help you get the proportions right. Be careful not to overwork the drawing, and avoid adding too much detail too soon. Instead, start with a light sketch and build up the details and shading gradually.
VI. Building on Drawing Skills
To take your ear drawing skills to the next level, focus on understanding shading and shadows, creating depth and texture, and capturing subtle variations in the ear’s shape and appearance. Use different pencils or charcoal to create gradations of light and dark, and experiment with different techniques to create texture and dimension. Practice shading the different parts of the ear to create a realistic and lifelike drawing.
VII. Creative Approaches
If you want to add some creativity to your ear drawing, try using unusual materials, mixed media techniques, or stylization. You can experiment with different drawing styles, such as cartoon or anime, to create a unique and interesting ear drawing. You can also use different materials, such as markers or paint, to add color and texture to your drawing.
VIII. Practice Exercises
Practice is key to improving your ear drawing skills. Here are a few practice exercises to try:
- Draw an ear from different angles, such as front, back, and side views.
- Sketch the ear using different materials, such as charcoal or pens.
- Draw different ear types, such as elf ears or animal ears, to develop your observation skills.
- Practice shading the different parts of the ear to create depth and texture.
Try to practice these exercises regularly to build your skills and confidence in drawing an ear.
IX. Conclusion
Drawing an ear can be a challenging but rewarding experience for beginner artists. By following some basic steps, understanding the ear’s anatomy and proportions, and practicing regularly, you can master the art of drawing an ear. Don’t forget to be creative and experiment with different techniques to make your ear drawing truly unique.


