I. Introduction
If you’re interested in learning how to draw, then being able to draw an eye that looks realistic is an essential skill to have in your arsenal. The human eye is a fascinating subject to draw, but can also be a challenging one. In this article, we’ll take you through the process of drawing an eye in simple, easy-to-follow steps. Whether you’re a beginner or an experienced artist looking to improve your skills, you’ll find valuable tips and tricks here that will help you create beautiful eye drawings.
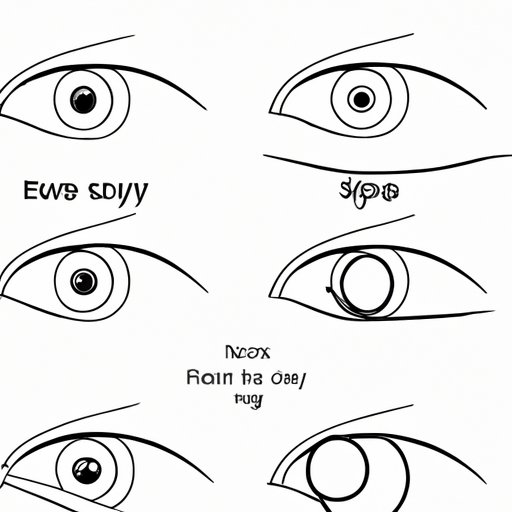
II. 7 Step-by-Step Instructions for Drawing a Realistic Eye
Before you start drawing an eye, make sure you have all the necessary tools: a pencil, paper, an eraser, and a fine-tipped pen (optional). Here’s how to draw an eye in seven simple steps:
- Begin with a basic sketch: Start by drawing a simple outline of the eye shape, including the iris and pupil.
- Add details to the iris: Draw the details of the iris, including the ridges and bumps.
- Shade the pupil: Shade the pupil, starting with a light pencil and then gradually building up the darkness.
- Draw the eyelashes: Add the eyelashes to the top and bottom of the eye.
- Shade the eyelid: Shade the eyelid to add depth and dimension to the eye.
- Add highlights: Use a fine-tipped pen or white pencil to put in highlights in the iris and on the eyelid.
- Erase and refine: Use an eraser to clean up any stray lines and refine the details of the eye.
If you’re having trouble visualizing each step, be sure to check out the accompanying visuals and diagrams.
III. A Beginner’s Guide to Drawing Eyes: Tips and Tricks
If you’re new to drawing eyes, there are a few things to keep in mind that can help you improve:
- Avoid symmetrical eyes: Real eyes aren’t perfectly symmetrical, so don’t feel like you need to create an exact copy of one eye to match the other.
- Start with basic shapes: Break down the eye into simple shapes to help build your foundation and keep proportions accurate.
- Don’t erase too much: Erasing too much can damage the paper and leave smudges that can show up in the final drawing. Use a light touch and minimal erasing.
- Practice regularly: The more you practice drawing eyes, the better and more confident you’ll become.
IV. The Easy Way to Draw an Eye: Breaking It Down into Simple Shapes
One of the easiest ways to draw an eye is to break it down into simple shapes. Here’s how:
- Start with an oval: Draw an oval shape to represent the eye.
- Add a circle for the iris: Inside the eye oval, draw a small circle to represent the iris.
- Add a smaller circle for the pupil: Draw a smaller circle within the iris for the pupil.
- Draw lines for eyelids: Add lines above and below the eye oval to represent the upper and lower eyelids.
- Add lashes and details: Add eyelashes and other small details to complete the eye.
Breaking down the eye into simple shapes can help you get a sense of its structure and proportions more easily, even if you’re not an experienced artist.
V. Drawing the Perfect Eye: Techniques for Depicting Light and Shadow
Light and shadow are essential for creating depth and dimension in an eye drawing. Here are some tips for shading your eye drawing:
- Use a light touch: Start with a very light pencil or shading tool and gradually build up the darkness as you go.
- Shade the iris: Shade the iris in small sections, creating concentric circles that build up to the outer edge.
- Shade the pupil: Use a very sharp pencil to create thin lines that radiate out from the pupil to the iris.
- Shade the eyelid: Use light shading to create depth on the underside of the eyelid.
- Add highlights: Use a white pencil or fine-tipped pen to add highlights in the areas of the eye that catch the light.
Accuracy is key when it comes to shading an eye, so take your time and be patient. Practice regularly to improve your skills.
VI. Mastering Eye Proportions: How to Draw Them Perfect Every Time
Eye proportions are another important aspect of creating a realistic eye drawing. Here are some tips for getting proportions right:
- Use the rule of thirds: Divide the eye into thirds and use those divisions to create a proportionate and symmetrical drawing.
- Pay attention to the distance between the eyes: The eyes should be roughly the same width as the distance between them.
- Draw each part of the eye to scale: The iris, pupil, and eyelashes should be drawn in proportion to each other.
Take your time with each part of the eye, and be sure to pay attention to the details to ensure that your drawing looks realistic.
VII. The Key to Drawing Beautiful Eyes: Understanding Eye Anatomy
To draw eyes that look realistic, it’s important to understand basic eye anatomy. Here are some tips:
- Know the parts of the eye: The eye consists of the iris, pupil, eyelid, and sclera (the white part of the eye).
- Understand the functions of each part: The iris regulates the amount of light that enters the eye, while the pupil controls the amount of light that reaches the retina.
- Draw different eye types: Round eyes, almond eyes, cat eyes, and other eye types all have different shapes and features that can be captured through careful attention to their anatomy.
Learning basic eye anatomy will help you create beautiful drawings that are accurate and realistic.
VIII. From Scribbles to Masterpieces: A Guide to Drawing Eyes for Kids and Adults
Whether you’re a kid or an adult, learning how to draw an eye is a fun and rewarding activity. Here are some tips to help you get started:
- Start with simple shapes: Kids can use basic shapes like circles and ovals to create an eye, while adults can use the grid method or other advanced techniques.
- Practice regularly: The more you draw, the more comfortable you’ll become with eye anatomy and proportions.
- Experiment with different techniques: Don’t be afraid to try out new techniques and styles to find the ones that work best for you.
Remember that drawing is a skill that takes time and practice to develop. Don’t get discouraged if your first few attempts don’t turn out the way you want them to. Keep practicing and see how your skills grow over time.
IX. Conclusion
Drawing an eye is a rewarding and fun activity that can help improve your artistic skills. By following the steps and tips outlined in this article, you’ll be well on your way to creating beautiful and realistic eye drawings. Remember to take your time and practice regularly, and don’t be afraid to experiment with different techniques and styles.


