I. Introduction
Butterflies are one of the most beautiful and fascinating creatures in nature. Their vibrant colors and intricate patterns make them a popular subject for artists of all levels. If you’re interested in learning how to draw a butterfly easy, you’re in the right place. In this article, we’ll cover a step-by-step guide, simple tips to master the art of butterfly drawing, easy techniques for sketching butterflies like a pro, expert secrets to drawing a butterfly with ease, and much more.
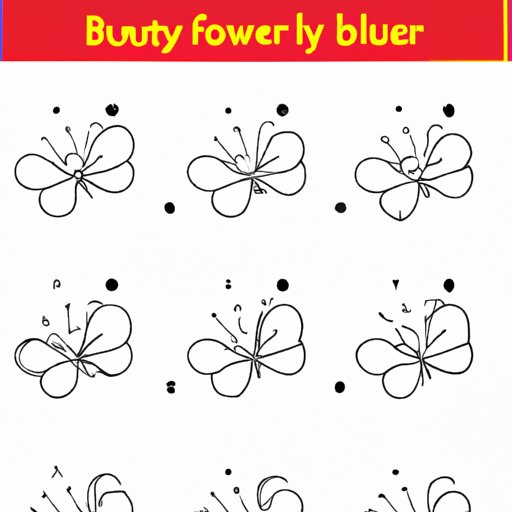
II. Step-by-Step Guide: Learn to Draw a Butterfly Easily
If you’re a beginner, the best way to learn how to draw a butterfly easy is to start with a step-by-step guide. Here’s how:
- Draw a large oval shape for the body of the butterfly.
- Add two smaller ovals on each side of the body for the wings.
- Connect the ovals with a curved line.
- Add details to the wings, such as stripes, dots, or shapes.
- Draw the antennae and eyes.
Remember, practice makes perfect. Don’t be discouraged if your first butterfly drawing doesn’t turn out exactly as you imagined. Keep practicing and refining your technique.
III. 5 Simple Tips to Master the Art of Drawing Butterflies
If you’re looking to improve your butterfly drawing skills, here are five simple tips to keep in mind:
- Observe real butterflies in nature or study photos to capture their unique colors and patterns.
- Master basic shapes and lines, which will make it easier to sketch more complex butterfly designs later on.
- Experiment with different mediums, such as pencil, pen, markers, or colored pencils to add color and depth to your drawings.
- Pay attention to proportions and symmetry. Butterflies have a symmetrical shape so it’s essential to make sure both wings are identical in size and shape.
- Don’t be afraid to add your own creative touch. Butterflies come in all shapes, sizes, and colors, so there’s no wrong way to draw them.
IV. Drawing Like a Pro: Easy Techniques for Sketching Butterflies
If you’re ready to take your butterfly drawing skills to the next level, here are some easy techniques to help you add depth and dimension to your butterfly sketches:
- Add shading to create a three-dimensional effect. Use a pencil or shading tool to create darker areas along the edges and lighter areas towards the center of the wings.
- Experiment with cross-hatching to create texture. Use short parallel lines in different directions to create a textured look.
- Use a blending tool to create a softer, more natural transition between colors.
- Try different coloring techniques such as stippling, layering, or gradient blending to create unique effects.
- Practice drawing in different perspectives, such as from the top or side, to create varying designs.
V. Butterfly Drawing Made Easy: Expert Secrets Unveiled
If you’re looking for insider tips to make your butterfly drawing even more effortless, here are some expert secrets to unveil:
- Pay attention to the veins on the wings, which create a detailed pattern that adds realism to your drawing.
- Consider adding a shadow or silhouette behind the butterfly, which can create a sense of depth and movement.
- Use a white gel pen or correction fluid to add highlights or areas of reflection to the wings.
- Experiment with different paper textures to create a unique background that complements your butterfly drawing.
- Don’t forget the small details, such as the tiny hairs on the antennae or the texture on the butterfly’s body. These small details can make a big difference in the overall design.
VI. Quick and Easy Butterfly Drawing Tutorial for Beginners
If you’re a beginner looking for a quick and easy tutorial, here’s a simple step-by-step guide that anyone can follow:
- Draw a small circle for the head.
- Draw a larger circle for the body, connecting it with the head.
- Add two small oval shapes for the upper wings and two more small oval shapes for the lower wings.
- Connect all the wings together with thin lines to create the butterfly’s shape.
- Add antennae, a smiley face, and a few dots or stripes to decorate your butterfly.
Remember, the most important thing is to have fun and be creative.
VII. Butterfly Drawing for Kids: Simplified Techniques to Try at Home
Encouraging kids to practice drawing and creativity is a great way to help them develop their artistic abilities from a young age. Here are some simplified techniques that kids can try at home:
- Start with basic shapes. Draw a large oval for the body and two smaller circles for the upper wings.
- Use different colors to decorate the butterfly’s wings, such as bright pink or glittery gold.
- Add googly eyes, glitter, or other fun decorations to make your butterfly more interesting.
- Encourage children to experiment with different mediums, such as crayons, colored pencils, or paint.
- Create a game or activity centered around butterfly drawing, such as a butterfly coloring book or a butterfly scavenger hunt in the backyard.
VIII. Conclusion
Learning how to draw a butterfly easy is a fun and rewarding hobby for people of all ages. By following our step-by-step guide, expert tips, and techniques, you can master the art of butterfly drawing in no time. Remember to practice regularly, pay attention to details, and don’t be afraid to experiment and add your own creative touch. Whether you’re a serious artist or just looking for a fun activity to do with your kids, drawing butterflies is a great way to express your creativity and explore the beauty of nature.


