Introduction
Eyeliner can enhance your overall look, making your eyes appear more captivating and striking. However, applying eyeliner can be a challenging process, especially for beginners who have little experience with makeup. This article aims to provide an in-depth guide to help beginners apply eyeliner with ease and confidence. The article will also cover advanced techniques for creating unique looks.
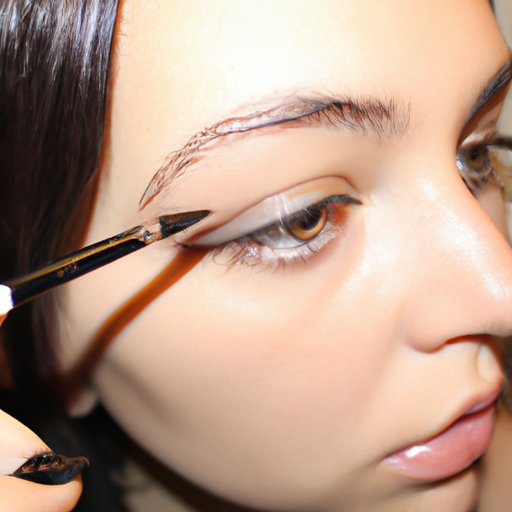
Step-by-Step Tutorial for Beginners
Before you start, select your eyeliner preference from the three main types: pencil, gel, or liquid. Pencil liners are the easiest and most forgiving of beginners, while gel liners are more suitable for advanced users. Once you’ve picked your desired liner, make sure you have the essential tools such as a brush applicator, a sharpener, and wipes ready.
To start, prepare your lids by cleaning any traces of oil or makeup and using an eye primer. When your eyelids are prepped and ready, gently draw a line parallel to your eyelashes with a pencil liner starting from the inner corners of your eyes towards your outer corners. Alternatively, use a liquid liner by angling the nozzle towards your outer corners, gradually thickening as you move from the inner to the outer edge of the eye.
Gel liners may need a steeper learning curve than pencil or liquid liners, but they are well worth the effort. Draw the line in short strokes towards the outer corners of your eyes, then use a brush to smoothen the line. Don’t worry about making mistakes as this technique is versatile and easily fixable.
Different Types of Liners for Different Occasions
Choosing the right eyeliner for the right occasion is crucial. For example, a smoky kohl pencil eyeliner may not be ideal for a beach day out. Here are some tips for each event:
Casual Daily Wear: Choose a pencil liner for a more natural look. Shades like brown, beige, and gray are perfect for everyday wear without drawing too much attention.
Weddings and Formal Events: For more dramatic looks, liquid and gel liners are preferable. Consider using a winged liner to make your eyes pop. Black or brown eyeliner is a timeless classic and great for formal events.
Parties and Nights Out: Bold looks can work well under bright lights and vibrant music. Experiment with bright and glittery eyeliners or choose experimental shapes like cat-eye or graphic neon lines.
How to Use Different Colored Eyeliners: Switching to colorful eyeliner can transform your overall look. Green liners enhance brown eyes while purple liners are great for green or blue eyes. Consider a white or nude liner on your waterline for a brighter and more awake look.
Applying Eyeliner to Complement Your Eye Shape
Just like any other product, you can enhance your eye shape by carefully applying the eyeliners. Below are tips to complement four different eye shapes:
Almond Shaped Eyes: Use a pencil liner to line the waterline of your eyes. Then, create a tight line using liquid or gel liner, gradually thickening towards the outer edge of the eye to enhance the almond shape.
Round Shaped Eyes: Apply a winged liner to elongate your eyes, drawing out a line towards the outer edge of your eyes. Avoid thick lines that can make your eye shape appear smaller.
Hooded Eyes: Use a liquid liner to create a winged line on the upper lash line, extending it beyond the crease line. Choose a bright color that can create the illusion of bigger eyes.
How to Apply Eyeliner to Enhance the Eyes: Apply eyeliner close to your lash line for a more natural look. For a dramatic and bold line, use an angled brush to create a cat-eye wings and extend the eyeliner beyond the corners of the eye.
Tips for Long-Lasting Eyeliner
Long-lasting eyeliner can be a lifesaver for those who wear makeup for long periods. You can avoid smudging and fading with these tips:
Primers: Before applying the eyeliner, use a primer to create a base and prolong the liner’s wear time.
Smudge-proof Liners: These liners can survive sweat, water, and humidity, making it perfect for daily wear.
Waterproofing Liners: For short water exposure like rain or splashes, waterproof liners are suitable. Avoid using them for long water exposure such as swimming.
How to Avoid Smudging: Wait for the liner to dry before you move your eyes. If you have hooded eyes, be extra careful when applying, to avoid transfer during blinking.
Creative and Fun Eyeliner Designs
For those who love to experiment with makeup, let your creativity shine by using unique eyeliner designs. Here are some ideas:
Graphic Eyeliner Designs: Create unique designs such as zigzags, curves or triangles. Use black gel or ink liners for a bold look.
Cat-Eye Styles: Perfecting the winged liner can be tricky, but with practice, the cat-eye style is achievable. Use a liquid or gel liner to outline the shape, fill it in, then smudge any areas where necessary for a tailored look.
Quirky Doodles: Experiment with simple doodles and drawings, like hearts, stars, or flowers for a playful touch.
Inspiration for Unique Eyeliner Styles: Looking for inspiration? Check out social media sites such as Instagram and Pinterest for unique eyeliner styles and ideas.
Simple DIY Eyeliner Looks
If you prefer more simplified looks with minimal products, try these tips:
Natural Liner Looks (Tightlining): Tightlining is perfect for creating natural liner looks. Apply eyeliner to the waterline of your eyes as close to the lash line as possible. It creates the illusion of more prominent, fuller lashes.
Achieving a Slightly Smoky Effect: Smudging the eyeliner can create a soft smokey effect. To achieve this look, use a pencil liner, then use a brush to smoothen the line.
Minimalistic Ideas for Using Eyeliner: Use a fine tip liquid liner to apply small dots on the outer corners of your eyes, creating a minimalistic pattern. You can also try drawing a line above the crease of your eyes for an alternative liner look.
Nailing the Perfect Winged Eyeliner Look
A perfect winged eyeliner is every makeup enthusiast’s dream. Here are tips and tricks to make it possible:
How to Create Symmetrical Lines: Draw dots on both eyes’ outer corners, connect the lines from the dots to the center of the lash line, extend the line towards the brow and fill it in.
Different Winged Liner Styles: Experiment with different styles such as the subtle winged liner, double winged liner, or the classic black winged liner for a variation of looks.
Tips for Different Eye Shapes: Avoid thick lines on hooded eyes and go for soft wings. For round eyes, draw a line extending beyond the outer corner of the eye to create an elongated look.
Closing Thoughts
To Wrap up, this article has provided a wide range of techniques, from simple tips to more advanced options for eyeliner application. To achieve a professional look, practice is essential. The more you practice, the more confident you become. Don’t be afraid to try different styles and colors; makeup is a form of self-expression, so have fun with it.
Final Tips and Advice: Always keep your liner sharp and clean. Invest in quality brands that suit your needs. Don’t rush the process and start with pencils first. You can always switch to gel or liquid liners when you’re comfortable.
Encouragement for Readers to Experiment with Different Styles: Your makeup journey is unique, and nobody knows your preferences better than yourself. Experiment until you find your signature style.
Conclusion
In conclusion, eyeliner application can be overwhelming at first, but with the right tools and techniques, anyone can perfect it. With this guide, you can achieve varying looks, from simple natural looks to bold and weird designs.
Call to Action for Readers to Apply Eyeliner with Confidence and Ease: Don’t be intimidated by eyeliner. Commit to practicing, and you’ll see a significant difference in your makeup routine. Embrace the makeup world and allow your creativity to shine through.


